WSO2 Carbon is the base platform for all WSO2 Java products.
Built on OSGi, Currently In Carbon there are 4 main SOA functionalities. They are as follows.
If you are willing to develop WSO2 Carbon , it is essential to build WSO2 Carbon from source rather than using a binary distribution. Building from source ensures that the source exists and compiles properly, which is the basis of regular open-source development.
By compiling from source, if you find some code you are able to isolate patches to address such problems, without having to wait for upstream.
Although bytecode runs on every vm that supports the version of the bytecode in question it does not mean that the bytecode produced by different compilers is equal. Bytecode can be optimized too. By building from source, we make it easy to switch the compiler used to compile your installed java programs.
Let's start build Carbon from source code
First of all you need Subversion (SVN) which is a version control system widely used in open source software development. You can install SVN from here based on your operating system.
Then also you need to install the build tool called Apache Maven. It is a open source Apache build manager for java projects. You can install Apache Maven from here.
Go to WSO2 Oxygen Tank SVN repository. Here you will see all the SVN repositories for all WSO2 products.
For WSO2 Carbon you have to checkout the following SVN repositories one by one to a specific location in local hard disk.
For that use "svn checkout" command.
e.g. ...../carbon$ svn checkout https://svn.wso2.org/repos/wso2/branches/carbon-platform/2.0
Now there will be a directory structure created as as follows.
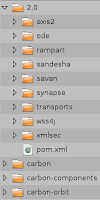
Then you will realise that there is a specific directory for each checkout you made. In each of those dirctoriers you will find (at the root level) a file called "pom.xml". It represent the complete Maven project and using that you can build the project from the source code.
Before build the project first of all we need to install the following plugins and modules which enables you to build the above project source codes successfully. Those plugins source codes are also get downloaded when checking out the https://svn.wso2.org/repos/wso2/branches/carbon-platform/2.0/axis2/ repository. You just have to install them using Maven.
For that go to "axis2" directory which is the first checkout you made. In that go to "modules/tool".
There you can see "axis2-aar-maven-plugin" and "axis2-mar-maven-plugin" named directories. In those directories you will see the pom.xml file for each. You have to go to those directories one at a time and build those plugins using Apache Maven with following commands in the console.
mvn clean install
(This is a command in Maven use to build the project with the help of "pom.xml" file and for more information use this Quick Guide)
After successfully install those plugins you can start to build the above checkedout projects one by one.
In console use command "mvn clean install -Dmaven.test.skip=true" in the root level of each directory as follows.
e.g. To build "axis2" go to the "axis2" directory , which is the directory the source is checked out from the repository https://svn.wso2.org/repos/wso2/branches/carbon-platform/2.0/axis2/. In console use the command as follows.
Such that use the following commands under the given directories with the given sequence.
Note - You have to build those 10 soucre directories one at a time and according to the given sequence as the later project source codes are depend on a prior project source codes. "ode" and "xmlsec" source directories are not required to be built.
After successfully building all 10 projects' source codes WSO2 Carbon is built from the source.
As well you can create IDE(Eclipse, IDEA, NetBeans) based projects using the Maven plugins.
Built on OSGi, Currently In Carbon there are 4 main SOA functionalities. They are as follows.
- WSO2 Web Services Application Server (WSAS)
- WSO2 Enterprise Service Bus (ESB)
- WSO2 Registry
- WSO2 Business Process Server (BPS)
If you are willing to develop WSO2 Carbon , it is essential to build WSO2 Carbon from source rather than using a binary distribution. Building from source ensures that the source exists and compiles properly, which is the basis of regular open-source development.
By compiling from source, if you find some code you are able to isolate patches to address such problems, without having to wait for upstream.
Although bytecode runs on every vm that supports the version of the bytecode in question it does not mean that the bytecode produced by different compilers is equal. Bytecode can be optimized too. By building from source, we make it easy to switch the compiler used to compile your installed java programs.
Let's start build Carbon from source code
First of all you need Subversion (SVN) which is a version control system widely used in open source software development. You can install SVN from here based on your operating system.
Then also you need to install the build tool called Apache Maven. It is a open source Apache build manager for java projects. You can install Apache Maven from here.
Go to WSO2 Oxygen Tank SVN repository. Here you will see all the SVN repositories for all WSO2 products.
For WSO2 Carbon you have to checkout the following SVN repositories one by one to a specific location in local hard disk.
- https://svn.wso2.org/repos/wso2/branches/carbon-platform/2.0
- https://wso2.org/repos/wso2/trunk/carbon-orbit
- https://wso2.org/repos/wso2/trunk/carbon
- https://wso2.org/repos/wso2/trunk/carbon-components
For that use "svn checkout" command.
e.g. ...../carbon$ svn checkout https://svn.wso2.org/repos/wso2/branches/carbon-platform/2.0
Now there will be a directory structure created as as follows.

Then you will realise that there is a specific directory for each checkout you made. In each of those dirctoriers you will find (at the root level) a file called "pom.xml". It represent the complete Maven project and using that you can build the project from the source code.
Before build the project first of all we need to install the following plugins and modules which enables you to build the above project source codes successfully. Those plugins source codes are also get downloaded when checking out the https://svn.wso2.org/repos/wso2/branches/carbon-platform/2.0/axis2/ repository. You just have to install them using Maven.
For that go to "axis2" directory which is the first checkout you made. In that go to "modules/tool".
There you can see "axis2-aar-maven-plugin" and "axis2-mar-maven-plugin" named directories. In those directories you will see the pom.xml file for each. You have to go to those directories one at a time and build those plugins using Apache Maven with following commands in the console.
mvn clean install
(This is a command in Maven use to build the project with the help of "pom.xml" file and for more information use this Quick Guide)
After successfully install those plugins you can start to build the above checkedout projects one by one.
In console use command "mvn clean install -Dmaven.test.skip=true" in the root level of each directory as follows.
e.g. To build "axis2" go to the "axis2" directory , which is the directory the source is checked out from the repository https://svn.wso2.org/repos/wso2/branches/carbon-platform/2.0/axis2/. In console use the command as follows.
- $current-location/axis2$ mvn clean install -Dmaven.test.skip=true
Such that use the following commands under the given directories with the given sequence.
- To build transports-> $curr.-location/2.0/transports$ mvn clean install -Dmaven.test.skip=true
- To build wss4j-> $curr.-location/2.0/wss4j$ mvn clean install -Dmaven.test.skip=true
- To build rampart-> $curr.-location/2.0/rampart$ mvn clean install -Dmaven.test.skip=true
- To build sandesha-> $curr.-location/2.0/sandesha$ mvn clean install -Dmaven.test.skip=true
- To build savan-> $curr.-location/2.0/savan$ mvn clean install -Dmaven.test.skip=true
- To build synapse-> $curr.-location/2.0/synapse$ mvn clean install -Dmaven.test.skip=true
- To build carbon-orbit-> $curr.-location/carbon-orbit$ mvn clean install -Dmaven.test.skip=true
- To build carbon-> $curr.-location/carbon$ mvn clean install -Dmaven.test.skip=true
- To build -carbon-components> $curr.-location/carbon-components$ mvn clean install -Dmaven.test.skip=true
Note - You have to build those 10 soucre directories one at a time and according to the given sequence as the later project source codes are depend on a prior project source codes. "ode" and "xmlsec" source directories are not required to be built.
After successfully building all 10 projects' source codes WSO2 Carbon is built from the source.
As well you can create IDE(Eclipse, IDEA, NetBeans) based projects using the Maven plugins.


